Pro Tools can be used as an application streaming source for both audio and video with Remoto Playback. In order for timecoded markers to be imported properly, MTC must be set up as well (please see this article). There is no direct communication occurring between Remoto and Pro Tools, all communication/exchanges that occur are occurring at an OS level.
This article explains how to set up Pro Tools as a streaming source from scratch with an existing session. There is a Pro Tools template that can be downloaded HERE that is preloaded with tracks (video and stereo through 9.1.6) with audio call outs for the channels to help you get started.
Before getting started, Pro Tools should be open and ready BEFORE Remoto Playback is opened.
This article contains 3 chapters:
- How to Set Up Pro Tools as an Audio Streaming Source with Remoto Playback
- How to Set Up Pro Tools as an Video Streaming Source with Remoto Playback
¶ How to Set Up Pro Tools as an Audio Streaming Source with Remoto Playback (4 Steps)
Step 1: Ensure Pro Tools is open, and the session you would like to load is open, and the Video window is open and visible as well.
Step 2: In Pro Tools IO settings, make sure “Aux IO” is enabled, and open the “Aux IO” window. Choose a “Pro Tools Audio Bridge” virtual audio device based upon the channel width desired, and make sure “Out” is checked.
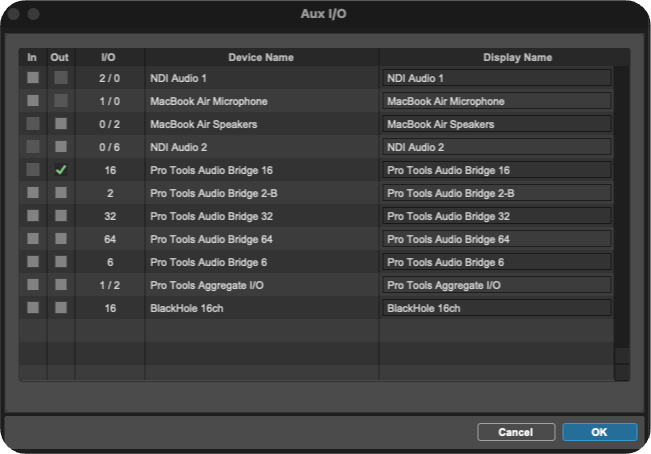
Please note, if you selected a multi-channel device, paths will be auto populated into stereo pairs. If you need a multi-channel path, please select and delete the stereo paths and create a new multichannel path based upon the channel width you need.
Step 3:
Option A) Monitor audio from Remoto Playback:
- Make sure your master track’s output destination feeds the output path previously designated (a Pro Tools Audio Bridge destination).
Option B) Feed Pro Tools Audio to Remoto for Streaming purposes, but monitor audio directly from Pro Tools:
- In addition to your main master fader, add an additional master fader. For the output of this additional master fader, route this master fader to the Pro Tools Audio bridge output that is feeding Remoto. One master fader will be feeding your system as normal and the other will be feeding Remoto for streaming purposes.
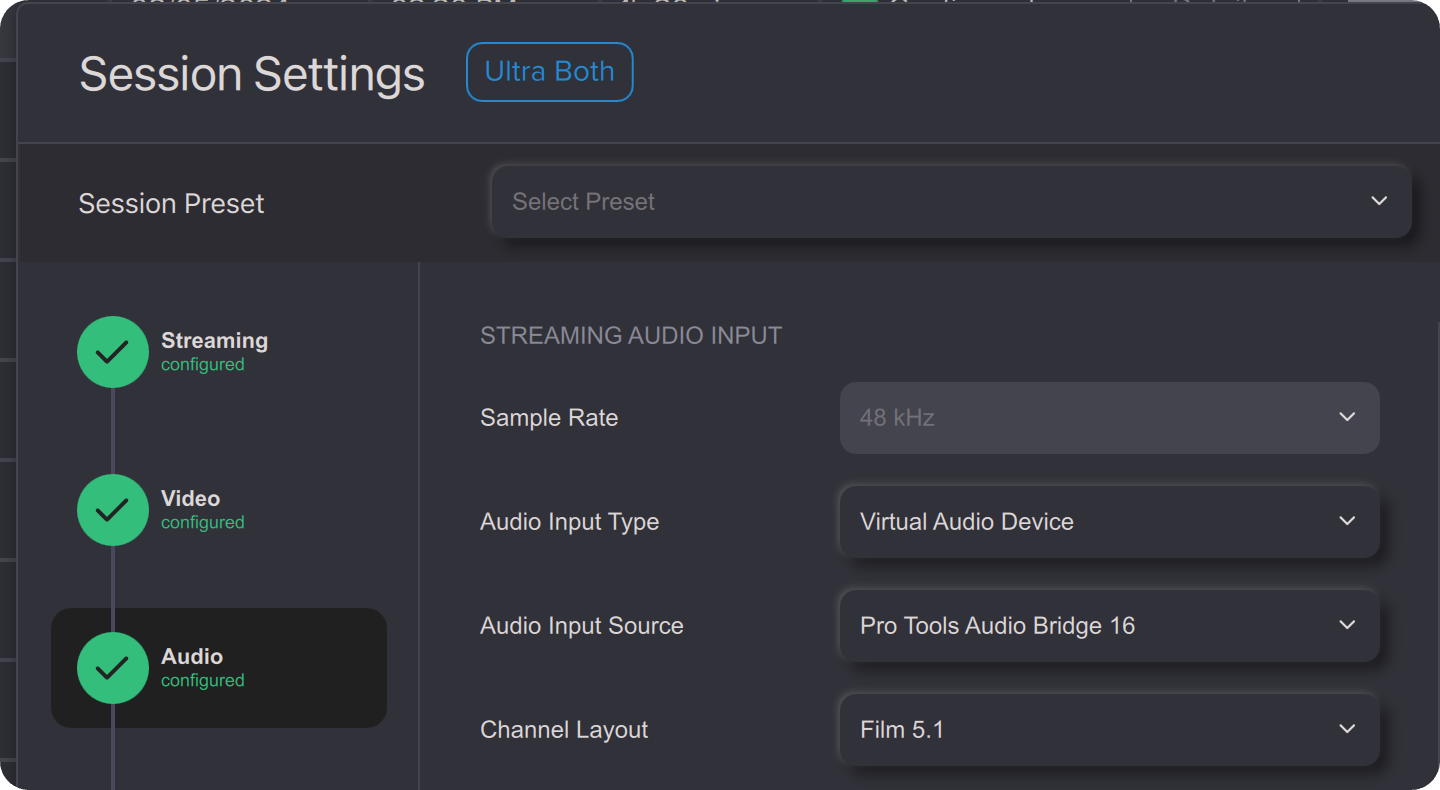
Step 4: Remoto Playback Audio Session Settings
In Remoto Playback’s Session Settings, make sure the Audio Input device is set to Virtual Audio Driver, and your Audio Device is set to the appropriate Pro Tools Audio Bridge based upon what you are using in Pro Tools, and that your Input Mode is set accordingly as well:
And now, Audio from Pro Tools still flow into Remoto Playback. When you start your streaming session, it will ask you to confirm call settings. In this window you can choose to have your stream audio routed through the same speakers as your call conferencing audio (default), or, you can choose to send your stream audio to a separate destination.
If you are monitoring off of Pro Tools and NOT from Remoto Playback, in the Live Session window, you can choose to turn your Stream audio all the way down so that you are not listening to it twice.
¶ How to Set Up Pro Tools as an Video Streaming Source with Remoto Playback
There are three different options to capture Pro Tools video as a streaming source for Remoto Playback:
Option A) Streaming the AVE video playback window through “Application” streaming
Option B) Streaming video using “Screen Capture”
Option C) Streaming video using NDI
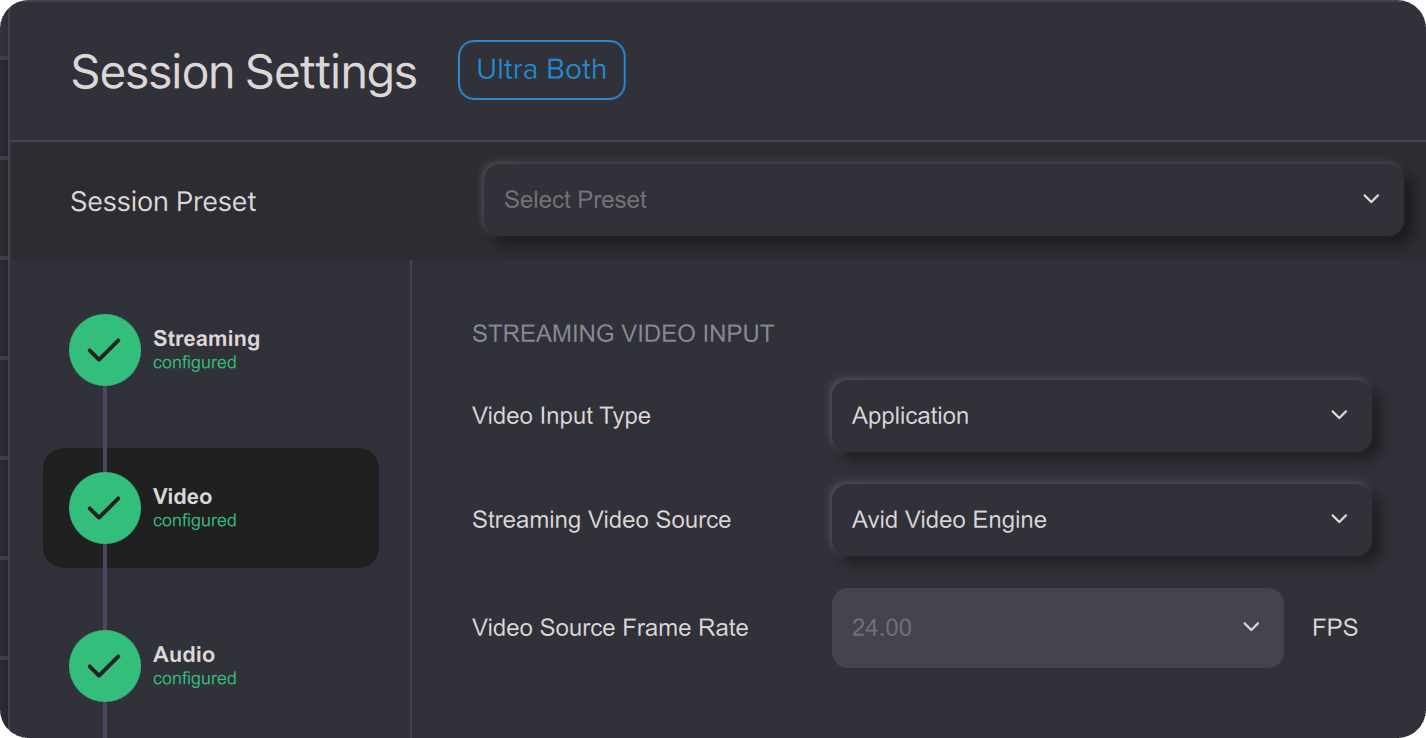
¶ Option A) Streaming the AVE video playback window through “Application” streaming (1 Step)
In order to stream your video window from Pro Tools, In Remoto’s Session Settings>Video Settings> Video Input Type, choose “Application”. Then, choose “Avid Video Engine” (Note: If you choose “Pro Tools”, you will be streaming your edit window) and set your Frame Rate according to the video you are streaming. Please note this option may be problematic in macOS Sonoma or higher - the OS does not handle capturing the whole application window very well and may result in cropped video.
¶ Option B) Streaming video using “Screen Capture” (1 Step)
In Remoto’s Session Settings>Video Settings> Video Input Type, select “Application” then select “Avid Video Engine”. A prompt to select a canvas size will appear; make the appropriate selection, and set the Frame Rate to match the video to be streamed.
¶ Option C) Streaming video using NDI
This option requires the installation of a free third party software called NDI Scan Converter, which is part of the NDI Core Suite by NDI Tools. NDI Scan Converter enables the capture and presentation of a display, or any combination of windows, applications, players, webcams, etc from a workstation, to any location within the network. In this case, NDI is used to capture the Pro Tools video window, allowing the window to be placed anywhere within the display window, and even operating behind other applications without issue.
Setting Up NDI as a Video Streaming Source for Remoto Playback (5 Steps)
Once the NDI Core Suite is downloaded, ensure Pro Tools and the Pro Tools Video Window are open.
Step 1: Open the “NDI Launcher” application, and launch “NDI Scan Converter”. The application opens and the top menu bar reads “NDI Scan Convertor”.
Step 2: In the menu bar, choose “Capture”, and select “Pro Tools”; the available windows are now displayed.
Streaming of the Pro Tools Video window to Remoto Playback is now enabled.
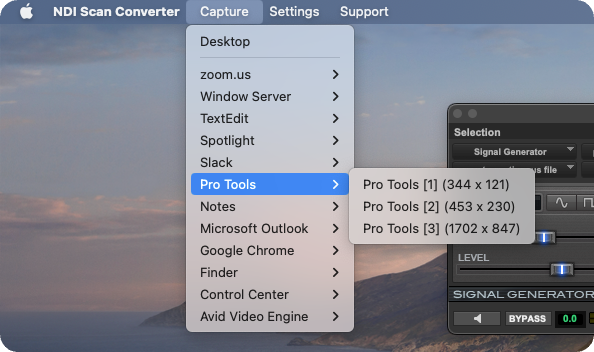
The windows are listed by resolution only. If there are many Pro Tools windows open on screen (such as for plug ins, etc.) determining the correct window to capture may require some trial and error.
Step 3: Select a window
Step 4: Mute NDI Audio
Once a window has been selected, go to “Settings” and ensure “Mute Audio” is selected.
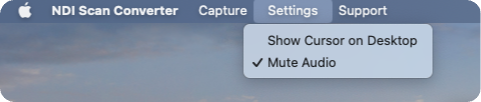
This is important! Since NDI is capturing both audio and video at the OS level, failing to mute the audio in NDI will route it to other programs and potentially cause feedback or other audio issues.
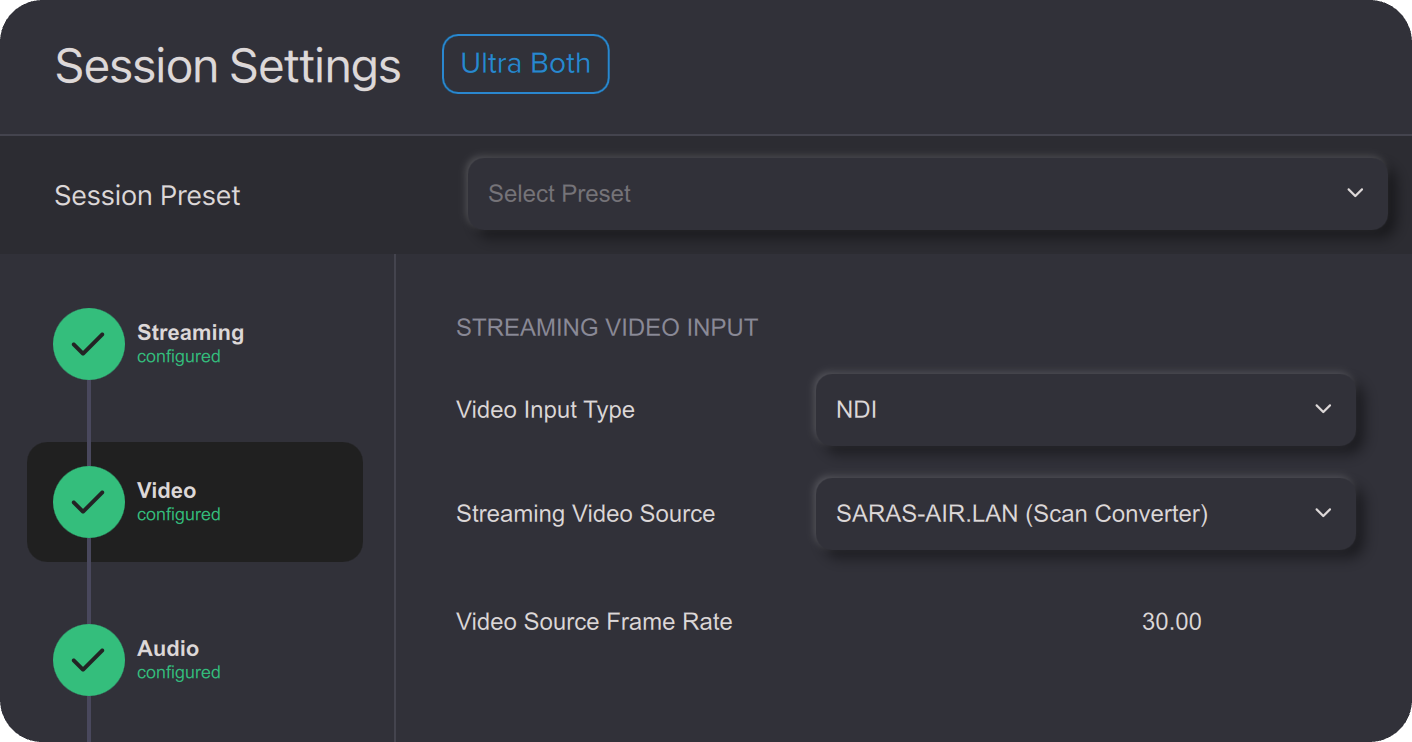
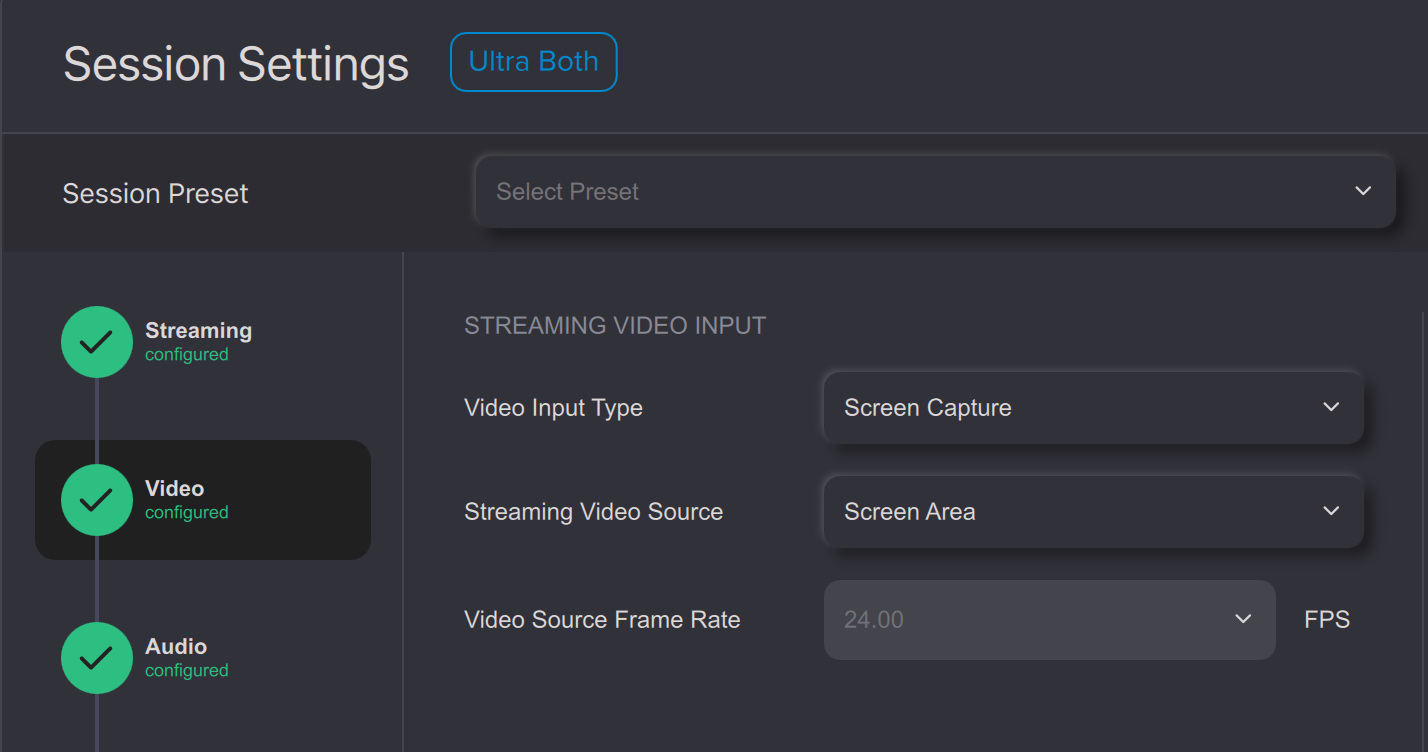
Step 5: Remoto Playback Video Session Settings
In Remoto Playback’s Session Settings Configuration page, under Video Settings, select “NDI” as the Video Input Type, revealing the only option available for Streaming Video Input: a single pre-configured option from NDI Scan Converter. The Frame Rate will be grayed out as it is predetermined by NDI Scan Converter.